Introduction
Section titled “Introduction”Why are we creating a documentation page?
Section titled “Why are we creating a documentation page?”Throughout the semester, we expanded our case study with new documents from one lab session to the next. These documents (with the exception of the SRS file) were created in Markdown and LikeC4, which, although readable by humans, are better suited for machine processing. Just consider that both Markdown and LikeC4 require a dedicated viewer.
In order to make the resulting documentation more accessible and readable for people (especially non-experts!), we will create a Astro Starlight-based documentation site. This eliminates the need for specialized viewing software; the target audience will be able to view the documentation using just a web browser.
Why are we using Astro?
Section titled “Why are we using Astro?”Our requirements for the documentation site are quite simple:
- We want a static site with no server-side logic.
- Our existing Markdown and LikeC4 files should be able to be added with minimal modification.
- There should be no need for extensive configuration.
Astro, and specifically its Starlight template, largely meets these requirements, since:
- By default, it generates a static site.
- It comes with built-in Markdown and MDX support, and LikeC4 support can be provided via plugins.
- If we don't want any frills, the configuration requirements are minimal.
It is also worth noting that Astro is one of today's most popular web frameworks, which can be used—beyond just documentation sites—to create any kind of website, primarily content-based ones.
Together: ChocoMarket Astro Conversion
Section titled “Together: ChocoMarket Astro Conversion”In the following, we will “Astro-fy” the ChocoMarket case study developed so far.
Before
Section titled “Before”In other words, where are we now? In its current form, the ChocoMarket repository contains the following files:
Directoryadr
- 01-architecture-style.md
- ac.md
- as.md
- asr.md
- diagram.likec4
- case-study.md
- README.md
- srs.doc
Initializing Starlight
Section titled “Initializing Starlight”As a first step, let's create a new, empty Astro Starlight page by following the official instructions:
Navigate to the folder where you cloned the repository.
Terminál cd 26-spring-00-chocomarketRun the command found on the Starlight: Getting Started page.
Terminál npm create astro@latest -- --template starlightThis will start the initialization process, the first step of which is installing the
create-astropackage (if it is not already available). Feel free to accept this:Need to install the following packages:create-astro@5.0.6Ok to proceed? (y)Next, we need to specify the folder where the new project should be created. By default, an automatically generated folder name (such as
./opposite-orbit) is displayed here, which we can safely leave as is.astro Launch sequence initiated.dir Where should we create your new project?./opposite-orbitWhen installing dependencies, select
Nousing the right arrow key:deps Install dependencies? (recommended)○ Yes ● NoSimilarly, decline the creation of a Git repository:
git Initialize a new Git repository? (optional)○ Yes ● NoAll done! The new Astro Starlight site will be located in the appropriate subfolder (in this example, the
opposite-orbitfolder)!
At this point, the directory structure of our repository is as follows:
Directoryadr
- 01-architecture-style.md
Directoryopposite-orbit/ This is where the Astro Starlight site is located
Directory.vscode/ VSCode configuration
- …
Directorypublic/ Files served as-is, without processing.
- …
Directorysrc/ The site's source code and assets to be processed.
- …
- .gitignore
- astro.config.mjs Configuration settings for our Astro site.
- package.json Description of the Astro site's dependencies.
- README.md
- tsconfig.json TypeScript configuration.
- ac.md
- as.md
- asr.md
- diagram.likec4
- case-study.md
- README.md
- srs.doc
Moving Up One Level
Section titled “Moving Up One Level”Unfortunately, Astro can only create a new page in an empty (or non-existent) folder, which is why we first had to place our page in a subfolder. However, this is no longer necessary, so let's move the relevant files up one level.
Navigate to the folder where we cloned the repository.
Terminál cd opposite-orbitmv public src .gitignore astro.config.mjs package.json tsconfig.json ../Then delete the now-unnecessary folder.
Terminál cd ..rm -rf ./opposite-orbit
In other words, the file structure at this point is as follows:
Directoryadr
- 01-architecture-style.md
Directorypublic/
- …
Directorysrc/
- …
- .gitignore
- ac.md
- as.md
- asr.md
- astro.config.mjs
- diagram.likec4
- case-study.md
- package.json
- README.md
- srs.doc
- tsconfig.json
First Run
Section titled “First Run”It's time to test whether our site works!
First, let's install the site's dependencies (you only need to do this once!). This may take up to 1-2 minutes.
Terminál npm iAfter that, we're ready to go:
Terminál npm run dev
Let the command above run, and navigate to the default address localhost:4321.
If everything went well, you'll be greeted by the following page:
Moving Existing Files
Section titled “Moving Existing Files”Now we just need to populate our Starlight site.
To do this, move your existing files as follows:
Directorypublic
- srs.doc
Directorysrc
Directorycontent
Directorydocs
Directoryadr
- 01-architecture-style.md
- ac.md
- as.md
- asr.md
- case-study.md
- .gitignore
- astro.config.mjs
- diagram.likec4
- package.json
- README.md
- tsconfig.json
Starlight requires that every Markdown file have a section called Frontmatter, which has two mandatory elements: title and description.
For example, for our as.md file, the Frontmatter could look like this:
---title: "Architectural Style"description: "A description of the chosen architectural styles."---
The architectural styles chosen for the project are as follows:- Event-driven architecture.- Modular monolith.
...
Add the appropriate Frontmatter section to the moved Markdown files! After that (and possibly after a restart), the pages generated from the Markdown files will display properly, for example localhost:4321/as.
However, you may notice that the sidebar menu does not yet contain your own pages. To fix this, you need to modify the contents of the astro.config.mjs file:
// @ts-checkimport { defineConfig } from "astro/config";import starlight from "@astrojs/starlight";
// https://astro.build/configexport default defineConfig({  integrations: [    starlight({      title: "My Docs",      social: [        {          icon: "github",          label: "GitHub",          href: "https://github.com/withastro/starlight",        },      ],      sidebar: [        {          label: "Case Study",          slug: "case-study",        },        {          label: "SRS",          link: "/srs.doc",        },        {          label: "Architectural Characteristics",          slug: "ac",        },        {          label: "Architecturally Significant Requirements",          slug: "asr",        },        {          label: "Architectural style",          slug: "as",        },        {          label: "Decision logs",          autogenerate: { directory: "adr" },        },      ],    }),  ],});
We manually link to most of the pages using slug, but there are two exceptions:
- The SRS, since it is not located in the
docsfolder but is a Word file in thepublicfolder, is linked to directly. - There may be multiple ADR files, so here we only specify the
adrfolder, the contents of which Starlight will automatically read.
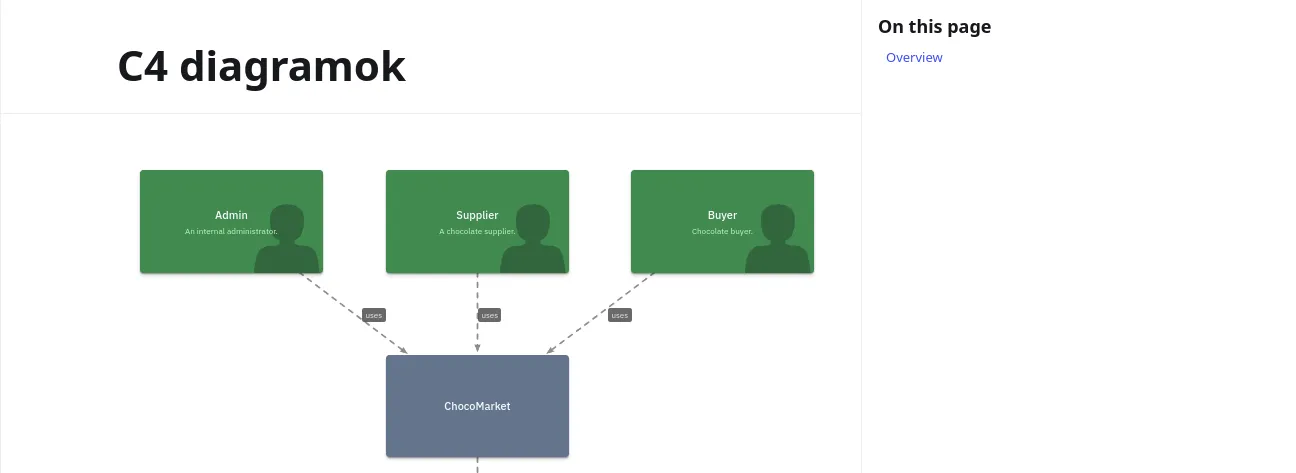
C4 Diagrams
Section titled “C4 Diagrams”All the Markdown is in place, so now only the C4 diagrams are missing. These are defined by the systemContextDiagram and containerDiagram views in the diagram.likec4 file. Let's see how we can display them!
Let's start by enabling LikeC4 support.
Install the React Astro plugin. Answer "yes" to the prompts.
Terminál npm run astro add reactInstall the LikeC4 dependency.
Terminál npm i likec4Enable LikeC4 support in our
astro.config.mjsconfiguration file.astro.config.mjs // @ts-checkimport { defineConfig } from "astro/config";import starlight from "@astrojs/starlight";import react from "@astrojs/react";import { LikeC4VitePlugin } from "likec4/vite-plugin";// https://astro.build/configexport default defineConfig({vite: {plugins: [LikeC4VitePlugin({})],},integrations: [starlight({title: "My Docs",social: [{icon: "github",label: "GitHub",href: "https://github.com/withastro/starlight",},],sidebar: [{label: "Case Study",slug: "case-study",},{label: "SRS",link: "/srs.doc",},{label: "Architectural Characteristics",slug: "ac",},{label: "Architecturally Significant Requirements",slug: "asr",},{label: "Architectural style",slug: "as",},{label: "Decision logs",autogenerate: { directory: "adr" },},],}),react(),],});Create a new Astro component that will be responsible for displaying LikeC4 charts. The component's code should be in a file named
src/components/LikeC4View.astro:src/components/LikeC4View.astro ---import { LikeC4View as ReactLikeC4View, type LikeC4ViewId } from 'likec4:react';interface Props {viewId: LikeC4ViewId;}const { viewId } = Astro.props---<ReactLikeC4ViewviewId= {viewId}{/* Configure view */}controls={false}browser={{// options for likec4 browserenableFocusMode: false,enableSearch: false,}}client:only="react"></ReactLikeC4View>
At this point, our Astro page is already capable of displaying LikeC4 charts.
Let's go ahead and create a new page that includes both views. This time, instead of Markdown, we'll create an MDX file so that we can use the LikeC4View component we just put together:
---title: "C4 diagrams"description: "C4 diagrams."---
import LikeC4View from '../../components/LikeC4View.astro';
<LikeC4View viewId="systemContextDiagram" /><LikeC4View viewId="containerDiagram" />
Make sure the import path and the names of the diagram views are correct!
After a restart, the page above will be available at localhost:4321/c4:
Next Steps
Section titled “Next Steps”The basics are now in place (the necessary documents are available), but there are still many ways we can spruce up our site to make it feel like a real documentation site:
- We can add a logo, change the colors, fonts, and the homepage:
- We can use built-in Starlight components for code snippets, cards, and notes:
- We can create any new pages we want, add to the ones above, and so on!
Together: ChocoMarket GitHub Pages
Section titled “Together: ChocoMarket GitHub Pages”The site now works great on our own machine, but what good is a website that only runs on a localhost? Exactly! We need to get it out onto the public internet somehow.
The Plan
Section titled “The Plan”When we chose a framework, one of the most important requirements was the ability to generate static websites. Such websites do not require active server-side components, as they consist solely of simple HTML/CSS/JS files. As a result, they can be served very cheaply and efficiently.
Service Providers
Section titled “Service Providers”Several service providers specialize in hosting such sites:
Fortunately, we don't need any of these, since all of this can be handled directly on GitHub through a service called GitHub Pages:
Domain
Section titled “Domain”We already have a “backend” that hosts our site, but it also needs an address where visitors can reach it.
GitHub Pages provides a subdomain for every organization:
ORGANIZATION.github.ioIn our case, this is:
unideb-advanced-software-engineering.github.ioUnder the appropriate subdomain, each repository is assigned a path:
ORGANIZATION.github.io/REPOThe ChocoMarket documentation page will therefore be available at the following address:
unideb-advanced-software-engineering.github.io/26-spring-00-chocomarketDeployment
Section titled “Deployment”The final question to address is deployment. When, what, and how will we deploy to the URL above?
- When?
- It makes sense that every time we
pushto our GitHub repository, we deploy a new version of the documentation site.
- It makes sense that every time we
- What?
- The static version of our Astro site. When we test the site locally with the
npm run devcommand, Astro runs a test server that responds to all our changes. To generate the final, static version of the site, we need to run a different command:npm run build.
- The static version of our Astro site. When we test the site locally with the
- How?
- We could do all of this manually, but that would be a very tedious and fragile workflow, so we'll automate the deployment using GitHub's CI/CD service, GitHub Actions.
Let's get started!
A megvalósítás
Section titled “A megvalósítás”Add our page's URL to the configuration.
astro.config.mjs // @ts-checkimport { defineConfig } from "astro/config";import starlight from "@astrojs/starlight";import react from "@astrojs/react";import { LikeC4VitePlugin } from "likec4/vite-plugin";// https://astro.build/configexport default defineConfig({site: "https://unideb-advanced-software-engineering.github.io",base: "/26-spring-00-chocomarket",vite: {plugins: [LikeC4VitePlugin({})],},integrations: [starlight({title: "My Docs",social: [{icon: "github",label: "GitHub",href: "https://github.com/withastro/starlight",},],sidebar: [{label: "Case Study",slug: "case-study",},{label: "SRS",link: "/srs.doc",},{label: "Architectural Characteristics",slug: "ac",},{label: "Architecturally Significant Requirements",slug: "asr",},{label: "Architectural style",slug: "as",},{label: "Decision Records",autogenerate: { directory: "adr" },},],}),react(),],});Create the GitHub Actions workflow that handles the deployment in the
.github/workflows/deploy.ymlfile..github/workflows/deploy.yml name: Deploy to GitHub Pageson:# Trigger the workflow every time you push to the `main` branch# Using a different branch name? Replace `main` with your branch's namepush:branches: [ main ]# Allows you to run this workflow manually from the Actions tab on GitHub.workflow_dispatch:# Allow this job to clone the repo and create a page deploymentpermissions:contents: readpages: writeid-token: writejobs:build:runs-on: ubuntu-lateststeps:- name: Check out your repository using Gituses: actions/checkout@v6- name: Install, build, and upload your siteuses: withastro/action@v6# with:# path: . # The root location of your Astro project inside the repository. (optional)# node-version: 24 # The specific version of Node that should be used to build your site. Defaults to 22. (optional)# package-manager: pnpm@latest # The Node package manager that should be used to install dependencies and build your site. Automatically detected based on your lockfile. (optional)# build-cmd: pnpm run build # The command to run to build your site. Runs the package build script/task by default. (optional)# env:# PUBLIC_POKEAPI: 'https://pokeapi.co/api/v2' # Use single quotation marks for the variable value. (optional)deploy:needs: buildruns-on: ubuntu-latestenvironment:name: github-pagesurl: ${{ steps.deployment.outputs.page_url }}steps:- name: Deploy to GitHub Pagesid: deploymentuses: actions/deploy-pages@v5Rock 'n' roll.
Terminál git push
If we've done everything correctly, our page will be deployed to the correct URL within a few minutes.
We can check the deployment on our GitHub page, for example, in the case of ChocoMarket:
Homework
Section titled “Homework”Follow the steps above for our group's repository and create an aesthetically pleasing, easy-to-navigate, logically structured documentation page for our case study solution!